Monday, August 31, 2015
The type or namespace name 'Twilio' could not be found
So, you have finally joined the exciting new world of ASP.NET 5.
Congratulations! And welcome!
You may be running Visual Studio 2015 - or maybe Visual Studio Code - and creating new DNX projects and ASP.NET 5 applications that target the latest .NET Framework 4.6 or .NET Core 5, running on DNX, and compiling with RyuJIT or the Roslyn platform.
Good for you!
So, let's say that you writing a DNX project that makes use of the Twilio SMS API Client.
If you're reading this blog, then you probably already know that Twilio SMS is an API that lets you programmatically send, receive and track text messages globally.
Your code, in simple terms, will look like the one below
Your logic looks solid.
You instantiate your Twilio client with your Account Sid and Auth Token, and you invoke the SendMessage service by passing in the appropriate parameters.
So why then, does your build fail and the Error List pane show the error below?
The type or namespace name 'Twilio' could not be found (are you missing a using directive or an assembly reference?)
How can this be?
You already have the correct Using statement.
And you have already installed the Twilio package through NuGet.
Well, what's happening here can be explained by looking at your "project.json" file.
Here, we see that both the "dnx451" (.Net Framework) and "dnxcore50" (.Net Core 5) are being targeted.
However, .Net Core 5 does NOT support the Twilio SDK. Ergo the "type or namespace" error.
There are a couple of ways to resolve this issue.
The first is to simply remove the "dnxcore50" from the list of targeted frameworks in the project.json file.
This is a simple and straightforward solution.
However, it does exclude the .NET Core 5 framework from your project altogether, and that may not be your intent.
The second alternative is something of a "shim".
Using a compiler directive, you can exclude any code that "dnxcore50" does not support.
In this way, you are still targeting the .NET Core 5 framework, but at the same time,
your app does not break on any code that the framework does not support.
Happy .Net coding!
Labels:
.NET Core,
.NET Foundation,
ASP.NET,
ASP.NET 5,
Core CLR,
DNX,
Rey David,
Roslyn,
RyuJIT,
Twilio,
Type or namespace name,
Visual Studio 2015,
VS 2015,
VS Code
Location:
Danville, CA 94506, USA
Saturday, January 11, 2014
Selecting Top n Rows from a Data Table
Let’s say that you wish to display rows of customer reviews and
other pertinent info on your web page. Unless
you are okay with the ugly default format of a GridView control, you will
probably want to use a Repeater control.
You will, of course, bind the Repeater control to a data source. And that data source will probably be a resulset
table from a stored procedure.
Reviews can take up a lot of real estate, though. So let’s say that you wish to limit the
number of reviews that show up initially on the page. You will provide a “Show More” button or a
pagination control to allow the user to see more reviews, as they desire.
In other words, you want a simple way to select the top n
rows from a data table. Before the
arrival of the .Net Framework 3.5 and LINQ, you would have had to write a
number of lines of code to implement this functionality. With LINQ, however, you can be down to one
line.
The code would look something like below:
Int pageSize
= 10;
repeaterReviews.DataSource
= reviewsDataTable.AsEnumerable().Take(pageSize).ToList();
repeaterReviews.DataBind();
The code looks like it makes a lot of sense, and that it
should work. But wait – in fact it does
not work. The data source that you bind
to the repeater control should be of type DataTable, which an IEnumerable of
List is not. To make this work, we will
need to convert the List back to a DataTable.
We do that by using the CopyToDataTable extension method of enumerable
types.
Thus our final code should look like below:
Int pageSize
= 10;
repeaterReviews.DataSource
= reviewsDataTable.AsEnumerable().Take(pageSize).CopyToDataTable();
repeaterReviews.DataBind();
Happy programming!
Tuesday, February 5, 2013
Sharing in a Windows 8 App (Part 2)
In Part 1 of this blog, we explained that Sharing is a
unique feature in Windows 8, and that it is a key differentiator from the
iPAD. Your app can declare that it is
able to share data, or receive shared data, or both. We introduced the DataTransferManager, which we will need to tell Windows that your
app wants to share data. We built a
simple XAML design surface with sample text to share. And we
implemented the DataRequested event
handler in the App.xaml code. Here in Part
2 we complete the rest of the code.
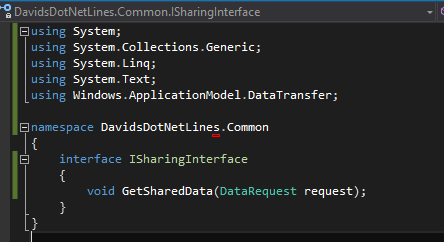
What we do now is dereference the page that is active. We do this using an interface, which we will
define as follows:
We will write the new GetCurrentPage
method as follows:
Now we create a page that implements the sharing interface. This will be the page that produces the data to share. The code in the page would look like below:
The only code we added were the using statement and the implementation of the GetSharedData method. We’ve
got all the code we need. Now when we
run this, we will see the following result:
Now we can bring up the charms
by hovering over the lower right corner of the screen.
When we click on the Share charm, we see a list on the right side like the one below.
This list simply identifies all of the Windows 8
applications that understand how to share the data type that you have declared.
When you select one of these applications, its corresponding dialog will appear. You will need to perform some action to complete the task of sharing the text data. If you chose the Mail application, you can expect something like the following in your mailbox.
And there you have it. We have built a Windows 8 application that is capable of sharing text data to other Windows 8 applications that understand how to share text data. We can use the very similar logic to share other data types, such as bitmaps and HTML files. The DataTransferManager is the key.
Sharing in a Windows 8 App (Part 1)
Sharing is a unique feature in Windows 8. It is a key differentiator from the
iPAD. Windows 8 Apps declare themselves
as one of the following:
a)
Able to share data,
b)
Able to receive shared data, or
c)
Both
Most of the time, your Windows 8 Apps will be sharing simple
data. These data types include:
a)
Plain text
b)
RTF
c)
HTML
d)
Bitmaps
e)
Files
f)
URIs
The general idea here is that you don’t declare a
format. Your app just states that it is
able to share plain text, or that it is able to share bitmaps, etc, and you
allow the target apps to make sense of the data. There is no strict sense of contracts, the
way that an Interface might enforce one.
All that your app is declaring is that it is able to share data, and not
that it can perform a certain task.
In order to handle outbound sharing, you will need to use
the DataTransferManager to tell
Windows that your app wants to be asked for shared data. When the user selects the Share charm, your app will be called,
and it will have the opportunity then to provide or share data.
The Request Handler
is registered globally, and the first thing you would need to do is to
dereference the current page. We will do
this using an interface. When sharing its
data, your app will first need to provide metadata about the data that it is
sharing, including the title and description of the data, before providing the
actual data.
For this demo, we will be sharing some basic text. What
I have done below is create a simple XAML design surface with a TextBlock and a
TextBox with some sample text in it. The
user will be able to enter any test they want, bring up the Share charm, say
that they wish to share the text, and that text will be shared by any application
that understands text.
The first thing we have to do is go into the App.xaml code and register the handler. In the OnLaunched event handler, at the very end, we write the following line of code:
We would write the method stub for this new method as
follows:
We implement the new DataRequested event handler as follows:
So far, we have discussed what Sharing in a Windows 8 app means. We introduced the DataTransferManager, which we will need to tell Windows that your app wants to share data. We built a simple XAML design surface with sample text to share. And we implemented the DataRequested event handler in the App.xaml code. In Part 2 we complete the rest of the code.
Tuesday, January 1, 2013
Error: DEP0700: Registration of the App Failed
You developed or are in the process of developing a Windows
8 Metro app. It has been compiling without
error for a while now. Good for you. All of a sudden – BAM! Your app throws the following build error out
of nowhere:
What just happened? I
would not know the specifics in your case, but somehow your local package
folder became un-writable. And because your
deployment could not write to your local folder, it crashed.
There are a couple of ways to resolve this. One way is to simply delete your local
package folder and rebuild. But I found
an easy and painless solution.
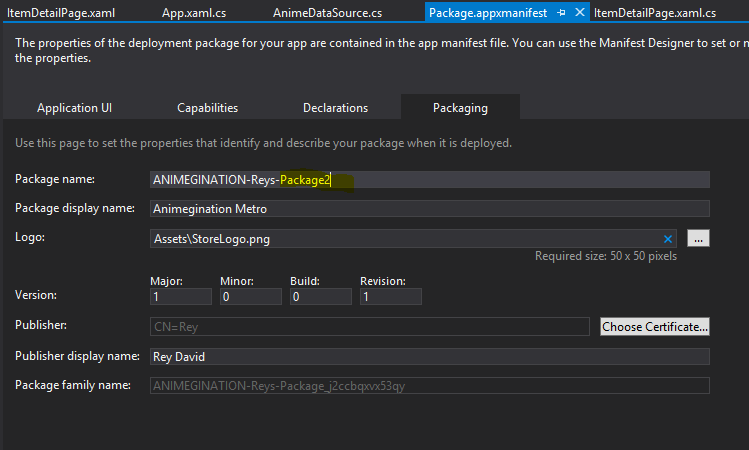
In the Package.AppManifest
designer, in the Packaging tab, you
can make a minor tweak to your Package name.
In my example I simply append the suffix “2” to the existing package
name.
What renaming your package name does is that it forces Windows to create a new local folder for your application – a new folder that does not have the write access restrictions that your old package had.
To recap: Windows 8
creates a local folder for your package.
If write access to this folder is somehow denied, your package will fail
to deploy. To work around this, you can
simply rename your package in the Packaging tab of the Package.AppManifest designer.
Sunday, December 30, 2012
Unable to Activate Windows Store App
You developed or are in the process of developing a Windows
8 Metro app. It compiles without
error. It runs beautifully. You are proud of yourself, as you should be.
One day you run your Window 8 app again, and
suddenly – BAM! Your app throws the
following error out of nowhere:How can this happen? It was running just fine the last time you worked on it.
What happened is that the developer license with which you
built your app has expired. You can try launching
your app again in a moment, as the error dialog suggests, but unfortunately this
error is not going to go away.
But wait! You had
already recently renewed your license, you say?
So why are you still getting this error?
As I stated earlier, the developer license with which this given app was
built is expired. Your other new apps
will work fine. You can uninstall and
reinstall this app and it will work fine.
You can start a new project and copy the old code over and it will work
fine. But that may be somewhat tedious.
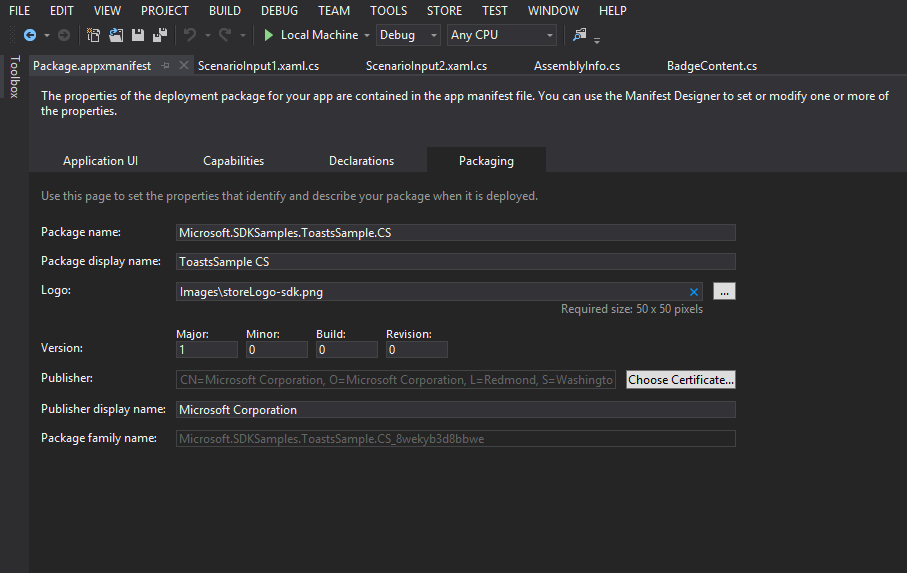
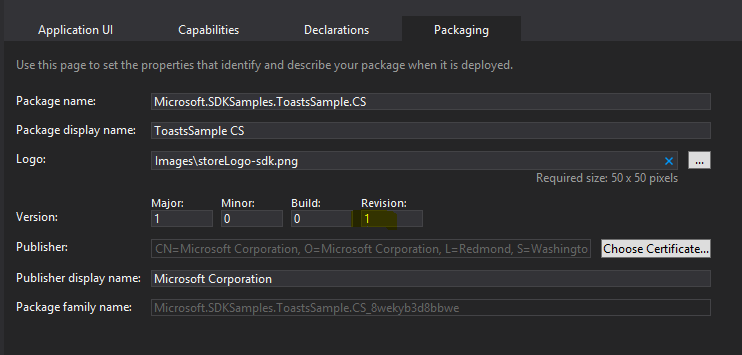
I have found an easy and painless workaround. In the Package.AppManifest
file, in the Packaging tab, you can
increment either the Build or the Revision numbers.
Of course you can change the Major or Minor numbers as well, but that would not be good practice.
To recap: the Windows Store App developer license is temporary; it expires after a few weeks. When it expires, your Windows 8 app expires with it. You will need to renew your license. To keep your older apps operational, you can simply change the build or revision number in the package manifest.
Tuesday, August 21, 2012
Deploy your Website Using IIS 7 - Part II
In Part I of this article, I explained how you could export
a package of your website from IIS 7. If
you haven’t already, please read
that blog here before continuing with this blog.
As I pointed out in that blog, it is an industry best
practice that developers not have access to the production server. To deploy a website from the Test environment
to the Production environment, I would export a package of my website in the
Test server. I would then instruct the
Release team (or their equivalent) to import this package into the IIS of the
Production server. All files in the
package contents would be identical in both environments.
Of course, you would want to exclude the web config files
and SSL Certificates and other environment-specific files from the package you
export.
Here in this blog I explain how your Release team can import
a package using the IIS Manager and the Web Deployment Tool in IIS 7.0 or
above.
Import a Package
1.
Open the IIS Manager by clicking Start -> Run and
typing INETMGR
2.
In IIS Manager, in the Connections pane, select the Server node
3.
In the right-hand Actions
pane, under Deploy, click the Import Server or Site Package… link to
launch the wizard
5.
Enter the Password used to Encrypt the Package

6.
In the Import
Server or Site Package dialog, Select All the Contents of the Package

7.
Click Next
8.
Confirm the Server Package Import. Click OK.

9.
The wizard will
now complete the package installation process.
When it is complete, you will see a Summary page that provides a
high-level overview of what items were installed from the package. The Details tab will give a lot of details on
exactly what was installed. Click
Finish.

That’s it. You (or your Release team) have now deployed
your website from your Test environment to your Production environment using
IIS 7 Manager.
Subscribe to:
Posts (Atom)