Thursday, October 20, 2016

Angular2 Custom Pipes on Two-Way Bound Input Controls


In my previous blog, I showed you how to create a custom pipe for phone numbers.  If you haven’t read it yet, I recommend that you do so before continuing with this article.  Click here for that blog


The custom pipe works great for formatting data in labels (i.e. one-way bound controls).


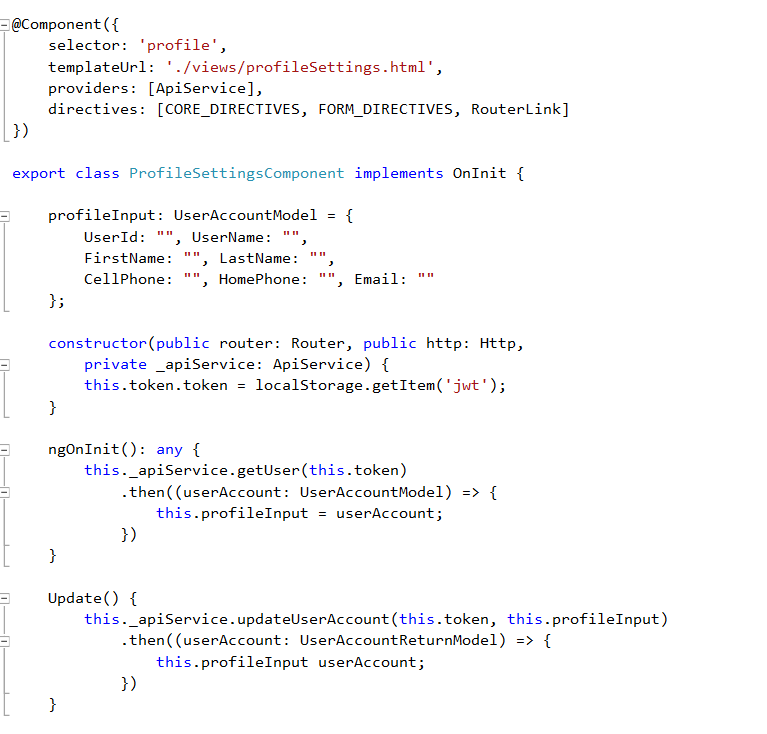
But what if you wanted to apply the custom pipe to an input control, and have it bind bi-directionally?  That is, the data from the data model is formatted in the view, and the data entered by the user is automatically validated and formatted as well?  What if you wanted to do something like the code below?


When you run this code, Angular2 will complain and throw a nasty exception like the one below:


The code is failing exactly for the reason that you see in the error message: You cannot use a pipe in an action expression, which is what the two-way binding of the input control is.  Double binding with pipes will not work.  Angular2 does not support it.

So, what do we do then?  Well, I’m glad you asked.

While we cannot do two-way data binding, we can still do one-way bindings.  We can break down what we are trying to do into two one-way data bindings, so that we format on the way out, and validate and format on the way in.  For this trick, we will need to listen to the Angular2 “ngModelChange” event for the input control. 

We filter the “ngModel” through our custom pipe, and we wire up our data model to the “ngModelChange” event.  Our code would now look like this:


Now your input control would exhibit behavior similar to a two-way-bound control, with the benefit of a pipe filter.  That's it.

I’d like to add a bonus tip.  If all you are looking for is to have the phone number formatted a certain way, and you did not want to take the trouble of building a custom pipe, then you can take advantage of HTML5’s new Phone Number Input Type Form Validation. 

This is simply an HTML5 input control with type=”tel” and a pattern attribute with the phone number regular expression that you would like to validate against.  You also have the option of adding a title, which would serve as a “hint” to the user.  It would require your user to comply with the pattern, but it would ensure that the input is valid.  Your markup code would now look like below:


When your user attempts to submit an invalid entry, the user would get a friendly error message and a hint.


And that is how you take advantage of HTML5’s built-in phone number input type form validation.

In this blog, I showed you how to make use of pipes in an input control that is intended to bind both ways.  I also showed an alternative way to validate two-way-bound input controls using HTML5 form validation.

Tuesday, October 18, 2016

Angular2 Custom Pipe for Phone


Angular2 pipes are great for formatting data labels.  And Angular2 already comes with a bunch of built-in pipes out-of-the-box, including the Date Pipe, Decimal Pipe, Currency Pipe, LowerCase and UpperCase Pipes, JSON Pipe, Percent Pipe, Slice Pipe, and Async Pipe.

“Why isn’t there a Pipe for telephone numbers?” you might ask.  Standardizing on phone number formats is notoriously tricky because, with all the different international phone number conventions, there are no standards.  So, if you need a Pipe for phone numbers, you need to build a custom Pipe yourself.  Unfortunately I could not find one on the web, so I wrote one myself.


You will need to import “Pipe” from Angular2 Core, give your new pipe a name, and implement or override the “Transform” function.


As you can see in the code, this Pipe will transform the input by a) stripping out any non-numeric characters, b) take only the first 10 valid characters, and c) apply the area code parenthesis and the hyphen separator.

To consume our Phone Pipe in our component, we would need to a) import the Pipe and b) declare it in the pipes array inside our Component decorator.


In our view, we apply the Phone Pipe as simply as below:


Regardless of the user’s input (entering invalid characters or entering more than 10 characters), the Phone Pipe will format it as you desired.

This Phone Pipe works great when you are just formatting a label.  But what if you wish to format the data in an input control?  Then we are talking about applying pipes to a control with two-way data binding, and that would be much trickier.

In this article, I showed you how to implement a custom Phone Pipe.  In my next blog, I will discuss how you can apply formatting and validation using pipes on an input control.

Sunday, October 16, 2016

NgModel Data Binding and Http Call fails with Undefined properties

I hope that this little tip would help save you the couple of hours that it took me to figure out.

I have an Angular2 component with a View that has two-way data binding to a TypeScript object model.   The component calls a Web API Service to populate and then update this object model.  The TypeScript model in the Angular2 component is identical to the strongly-typed Data Model in the Web API.  But when I subscribe to the Web API Service and then assign its result to my object model, the properties of my object model become “Undefined”.

This is my Angular2 component (abbreviated for brevity):


This is my Angular2 view (abbreviated for brevity):


This is my TypeScript model for the UserAccounts object:


This is my implementation of the "updateUserAccount" service in the Web API, with some Swagger annotations:


This Http PUT operation is returning a data object of type “UserAccount”.

And this is my strongly-typed UserAccount class in my Web API:


As you can see, the data models in the Angular2 client component and the Web API server response are identical. 


In fact, at the "ngOnInit" event handler, the call to the “getUser” service is successful, returning a response of type “UserAccountModel”, and populating the view with the object data accordingly.


This is what the view looks like after “ngOnInit”:

The “Update” event handler is nearly identical.  It makes a call to the “updateUserAccount” service of the Web API, which is an Http PUT verb operation.  The “profileInput” parameter is of type “UserAccountModel”, and the API service return type is also “UserAccountModel”.
However, once execution enters this “Update” event handler, the properties of the “profileInput” object become "Undefined".  Assigning the property values of the return object to the individual properties of the “profileInput” object did not help either.


I have verified that the Web API service was returning a response successfully.  Yet the two-way bound properties of the data object were becoming Undefined.  So what the heck is going on?

It turns out that, unlike the return objects from my Web API’s GET operations, the return objects from my Web API’s PUT operations undergo a quirky transformation.  Specifically the casing of their property names is automatically changed to Pascal Case, so that the first letter of each property name becomes lowercase.

Below is what a similar object would look like in Google’s Developer Tools.  Notice that the property names are in Pascal Case, whereas the derived data model was defined with Camel Case.  That incongruity caused the property assignments to the “profileInput” object in the Angular2 client component to fail.


I had to create a new TypeScript data model that observed this new casing, and use that as the return data type from the Web API call.

Replacing the UserAccountModel with the UserAccountReturnModel as the return type of the “updateUserAccount” service call, everything began to work as expected.
The ngModel two-way data binding does not really have any direct relevance to the quirk with the return object from the Web API, but I did mention it in this article because the symptoms of this issue might be confused with the two-way data binding with the data model during an HTTP call.


In this blog, I showed a “gotcha” when making HTTP service calls and the object types returned from those calls. 


Thursday, December 10, 2015

Word.Application.Documents.Open returns a Null


Okay, so you have embarked on a project that requires dynamically generating Microsoft Office Word documents based on a template Word document. 

Naturally you have already added a Reference to the "Microsoft Word Object Library" to your project, by right-clicking on your project, Adding Reference / COM / Type Libraries / Microsoft Word Object Library.
I have the 15.0 version of the Word object library for my project.

You have written the appropriate C# server-side code to open the document, by using the "Documents.Open" method of the Word.Application object.


Everything works in your local development environment.  Hurray for you!
But hold on. 

While everything works in your machine, it fails in the web server you deployed your application to.
You get the error message:
    An exception of type 'System.NullReferenceException' occurred but was not handled in user code.
    Additional information: Object reference not set to an instance of an object.

How can that be?

The answer is that Word failed to open the document because you did not have the proper permissions to do so.
Or rather, the user account which tried to open the Word document did not have appropriate access rights.

Below is the unintuitive solution for you.
Open the Component Services module from the Start Menu, or search for it.
You can manually start it from "C:\Windows\System32\comexp.msc"


In the Component Services window, expand the nodes to Console Root / Component Services / Computers / My Computer / DCOM Config


Under DCOM Config, scroll down to find "Microsoft Word 97 - 2003 Document" or its equivalent in your server.


Right-click on "Microsoft Word 97 - 2003 Document", select Properties / Identity.


In the Identity tab, change the option control selection from "The launching user" to "The interactive user".

Hit OK and Exit. 

And voila! 
Your frustrating error goes away, and your application magically works as you expected in your web server.


Monday, August 31, 2015

The type or namespace name 'Twilio' could not be found


So, you have finally joined the exciting new world of ASP.NET 5. 
Congratulations!  And welcome!

You may be running Visual Studio 2015 - or maybe Visual Studio Code - and creating new DNX projects and ASP.NET 5 applications that target the latest .NET Framework 4.6 or .NET Core 5, running on DNX, and compiling with RyuJIT or the Roslyn platform.
Good for you!

So, let's say that you writing a DNX project that makes use of the Twilio SMS API Client.
If you're reading this blog, then you probably already know that Twilio SMS is an API that lets you programmatically send, receive and track text messages globally.

Your code, in simple terms, will look like the one below


Your logic looks solid. 
You instantiate your Twilio client with your Account Sid and Auth Token, and you invoke the SendMessage service by passing in the appropriate parameters.

So why then, does your build fail and the Error List pane show the error below?


The type or namespace name 'Twilio' could not be found (are you missing a using directive or an assembly reference?)

How can this be? 
You already have the correct Using statement.
And you have already installed the Twilio package through NuGet.

Well, what's happening here can be explained by looking at your "project.json" file.


Here, we see that both the "dnx451" (.Net Framework) and "dnxcore50" (.Net Core 5) are being targeted.
However, .Net Core 5 does NOT support the Twilio SDK.  Ergo the "type or namespace" error.

There are a couple of ways to resolve this issue.
The first is to simply remove the "dnxcore50" from the list of targeted frameworks in the project.json file.


This is a simple and straightforward solution.
However, it does exclude the .NET Core 5 framework from your project altogether, and that may not be your intent.

The second alternative is something of a "shim". 
Using a compiler directive, you can exclude any code that "dnxcore50" does not support.


In this way, you are still targeting the .NET Core 5 framework, but at the same time,
your app does not break on any code that the framework does not support.

Happy .Net coding!

Saturday, January 11, 2014

Selecting Top n Rows from a Data Table


Let’s say that you wish to display rows of customer reviews and other pertinent info on your web page.  Unless you are okay with the ugly default format of a GridView control, you will probably want to use a Repeater control.  You will, of course, bind the Repeater control to a data source.  And that data source will probably be a resulset table from a stored procedure.

Reviews can take up a lot of real estate, though.  So let’s say that you wish to limit the number of reviews that show up initially on the page.  You will provide a “Show More” button or a pagination control to allow the user to see more reviews, as they desire.

In other words, you want a simple way to select the top n rows from a data table.  Before the arrival of the .Net Framework 3.5 and LINQ, you would have had to write a number of lines of code to implement this functionality.  With LINQ, however, you can be down to one line.

The code would look something like below:
Int pageSize = 10;
repeaterReviews.DataSource = reviewsDataTable.AsEnumerable().Take(pageSize).ToList();
repeaterReviews.DataBind();

The code looks like it makes a lot of sense, and that it should work.  But wait – in fact it does not work.  The data source that you bind to the repeater control should be of type DataTable, which an IEnumerable of List is not.  To make this work, we will need to convert the List back to a DataTable.  We do that by using the CopyToDataTable extension method of enumerable types.

Thus our final code should look like below:
Int pageSize = 10;
repeaterReviews.DataSource = reviewsDataTable.AsEnumerable().Take(pageSize).CopyToDataTable();
repeaterReviews.DataBind();

Happy programming!


Tuesday, February 5, 2013

Sharing in a Windows 8 App (Part 2)


In Part 1 of this blog, we explained that Sharing is a unique feature in Windows 8, and that it is a key differentiator from the iPAD.  Your app can declare that it is able to share data, or receive shared data, or both.  We introduced the DataTransferManager, which we will need to tell Windows that your app wants to share data.  We built a simple XAML design surface with sample text to share.   And we implemented the DataRequested event handler in the App.xaml code.  Here in Part 2 we complete the rest of the code.

What we do now is dereference the page that is active.  We do this using an interface, which we will define as follows:


We will write the new GetCurrentPage method as follows:


Now we create a page that implements the sharing interface.  This will be the page that produces the data to share.  The code in the page would look like below:


The only code we added were the using statement and the implementation of the GetSharedData method.  We’ve got all the code we need.  Now when we run this, we will see the following result:


Now we can bring up the charms by hovering over the lower right corner of the screen.


When we click on the Share charm, we see a list on the right side like the one below.


This list simply identifies all of the Windows 8 applications that understand how to share the data type that you have declared.


When you select one of these applications, its corresponding dialog will appear.  You will need to perform some action to complete the task of sharing the text data.  If you chose the Mail application, you can expect something like the following in your mailbox.


And there you have it.  We have built a Windows 8 application that is capable of sharing text data to other Windows 8 applications that understand how to share text data.  We can use the very similar logic to share other data types, such as bitmaps and HTML files.  The DataTransferManager is the key.